
Tutorial - How to convert OpenVINO IR model locally to run on DepthAI
In this tutorial, you’ll learn how to convert OpenVINO IR models into the format required to run on DepthAI, even on a low-powered Raspberry Pi. I’ll introduce you to the OpenVINO toolset, the Open Model Zoo (where we’ll download the face-detection-retail-0004 model), and show you how to generate the files needed to run model inference on your DepthAI board.
Haven’t heard of OpenVINO or the Open Model Zoo? I’ll start with a quick introduction of why we need these tools.
What is OpenVINO?
Under-the-hood, DepthAI uses the Intel tecnnology to perform high-speed model inference. However, you can’t just dump your neural net into the chip and get high-performance for free. That’s where OpenVINO comes in. OpenVINO is a free toolkit that converts a deep learning model into a format that runs on Intel Hardware. Once the model is converted, it’s common to see Frames Per Second (FPS) improve by 25x or more. Are a couple of small steps worth a 25x FPS increase? Often, the answer is yes!
What is the Open Model Zoo?
The Open Model Zoo is a library of freely-available pre-trained models. The Zoo also contains scripts for downloading those models into a compile-ready format to run on DepthAI.
DepthAI is able to run many of the object detection models in the Zoo.
Install OpenVINO
error
If you have OpenVINO installed or want to follow official installation, skip this step.
Please note that the following install instructions are for Ubuntu 18.04 OS, if you intend to use other OS, follow the official OpenVINO installation
DepthAI requires OpenVINO version 2020.1. Let’s get a package for our OS and meeting this version with the following command:
apt-get update
apt-get install -y software-properties-common
add-apt-repository -y ppa:deadsnakes/ppa
apt-get update
apt-get install -y wget pciutils python3.8 libpng-dev libcairo2-dev libpango1.0-dev libglib2.0-dev libgtk2.0-dev libswscale-dev libavcodec-dev libavformat-dev
cd
mkdir openvino_install && cd openvino_install
wget http://registrationcenter-download.intel.com/akdlm/irc_nas/16345/l_openvino_toolkit_p_2020.1.023.tgz
tar --strip-components=1 -zxvf l_openvino_toolkit_p_2020.1.023.tgz
./install_openvino_dependencies.sh
./install.sh # when finished, you can go ahead and do "rm -r ~/openvino_install"
Now, first screen we’ll wee is EULA, just hit Enter, scroll through and type accept.
Next one is agreement to Intel Software Improvement Program, it’s not relevant so you can choose whether consent (1) or not (2)
Next, you may see the Missing Prerequisites screen showing that Intel® Graphics Compute Runtime for OpenCL™ Driver is missing - you can go ahead and ignore this warning.
Finally, we’ll see the install summary - please verify that it has a correct location pointed out - /opt/intel.
If all looks good, go ahead and proceed (1). If the missing prerequisites screen appears again, feel free to skip it.
Let’s verify that a correct version is installed on your host. Check your version by running the following from a terminal session:
cat /opt/intel/openvino/inference_engine/version.txt
You should see output similar to:
Thu Jan 23 19:14:14 MSK 2020
d349c3ba4a2508be72f413fa4dee92cc0e4bc0e1
releases_2020_1_InferenceEngine_37988
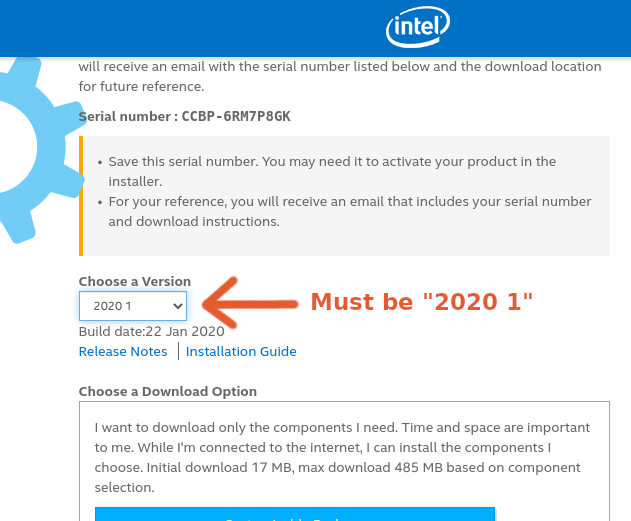
Verify that you see releases_2020_1 in your output. If you do, move on. If you are on a different version, goto the OpenVINO site and download the 2020.1 version for your OS:
Check if the Model Downloader is installed
When installing OpenVINO, you can choose to perform a smaller install to save disk space. This custom install may not include the model downloader script. Lets check if the downloader was installed. In a terminal session, type the following:
find /opt/intel/ -iname downloader.py
Move on if you see the output below:
/opt/intel/openvino_2020.1.023/deployment_tools/open_model_zoo/tools/downloader/downloader.py
Didn’t see any output? Don’t fret if downloader.py isn’t found. We’ll install this below.
Install Open Model Zoo Downloader
If the downloader tools weren’t found, we’ll install the tools by cloning the Open Model Zoo Repo and installing the tool dependencies.
Start a terminal session and run the following commands in your terminal:
apt-get install -y git curl
curl https://bootstrap.pypa.io/get-pip.py -o get-pip.py
python3 get-pip.py
rm get-pip.py
cd ~
git clone https://github.com/opencv/open_model_zoo.git
cd open_model_zoo
git checkout tags/2020.1
cd tools/downloader
python3 -m pip install --user -r ./requirements.in
This clones the repo into a ~/open_model_zoo directory, checks out the required 2020.1 version, and installs the downloader dependencies.
Create an OPEN_MODEL_DOWNLOADER environment variable
Typing the full path to downloader.py can use a lot of keystrokes. In an effort to extend your keyboard life, let’s store the path to this script in an environment variable.
Run the following in your terminal:
export OPEN_MODEL_DOWNLOADER='INSERT PATH TO YOUR downloader.py SCRIPT'
Where INSERT PATH TO YOUR downloader.py SCRIPT can be found via:
find /opt/intel/ -iname downloader.py
find ~ -iname downloader.py
For example, if you installed open_model_zoo yourself:
export OPEN_MODEL_DOWNLOADER="$HOME/open_model_zoo/tools/downloader/downloader.py"
Download the face-detection-retail-0004 model
We’ve installed everything we need to download models from the Open Model Zoo! We’ll now use the Model Downloader to download the face-detection-retail-0004 model files. Run the following in your terminal:
$OPEN_MODEL_DOWNLOADER --name face-detection-retail-0004 --output_dir ~/open_model_zoo_downloads/
This will download the model files to ~/open_model_zoo_downloads/. Specifically, the model files we need are located at:
~/open_model_zoo_downloads/intel/face-detection-retail-0004/FP16
You’ll see two files within the directory:
ls -lh
total 1.3M
-rw-r--r-- 1 root root 1.2M Jul 28 12:40 face-detection-retail-0004.bin
-rw-r--r-- 1 root root 100K Jul 28 12:40 face-detection-retail-0004.xml
The model is in the OpenVINO Intermediate Representation (IR) format:
- face-detection-retail-0004.xml - Describes the network topology
- face-detection-retail-0004.bin - Contains the weights and biases binary data.
This means we are ready to compile the model for the MyriadX!
Compile the model
The MyriadX chip used on our DepthAI board does not use the IR format files directly. Instead, we need to generate two files:
face-detection-retail-0004.blob- We’ll create this file with themyriad_compilecommand.face-detection-retail-0004.json- Ablob_file_configfile in JSON format. This describes the format of the output tensors. You can read more about this file structure and examples here
We’ll start by creating the blob file.
Locate myriad_compile
Let’s find where myriad_compile is located. In your terminal, run:
find /opt/intel/ -iname myriad_compile
You should see the output similar to this
find /opt/intel/ -iname myriad_compile
/opt/intel/openvino_2020.1.023/deployment_tools/inference_engine/lib/intel64/myriad_compile
Since it’s such a long path, let’s store the myriad_compile executable in an environment variable (just like OPEN_MODEL_DOWNLOADER):
export MYRIAD_COMPILE=$(find /opt/intel/ -iname myriad_compile)
Activate OpenVINO environment
In order to use myriad_compile tool, we need to activate our OpenVINO environment.
First, let’s find setupvars.sh file
find /opt/intel/ -name "setupvars.sh"
/opt/intel/openvino_2020.1.023/opencv/setupvars.sh
/opt/intel/openvino_2020.1.023/bin/setupvars.sh
We’re interested in bin/setupvars.sh file, so let’s go ahead and source it to activate the environment:
source /opt/intel/openvino_2020.1.023/bin/setupvars.sh
[setupvars.sh] OpenVINO environment initialized
If you see [setupvars.sh] OpenVINO environment initialized then your environment should be initialized correctly
Run myriad_compile
$MYRIAD_COMPILE -m ~/open_model_zoo_downloads/intel/face-detection-retail-0004/FP16/face-detection-retail-0004.xml -ip U8 -VPU_MYRIAD_PLATFORM VPU_MYRIAD_2480 -VPU_NUMBER_OF_SHAVES 4 -VPU_NUMBER_OF_CMX_SLICES 4
You should see:
Inference Engine:
	API version ............ 2.1
	Build .................. 37988
	Description ....... API
Done
Where’s the blob file? It’s located in the same folder as face-detection-retail-0004.xml:
ls -lh ~/open_model_zoo_downloads/intel/face-detection-retail-0004/FP16/
total 2.6M
-rw-r--r-- 1 root root 1.2M Jul 28 12:40 face-detection-retail-0004.bin
-rw-r--r-- 1 root root 1.3M Jul 28 12:50 face-detection-retail-0004.blob
-rw-r--r-- 1 root root 100K Jul 28 12:40 face-detection-retail-0004.xml
Create the blob config file
The MyriadX needs both a blob file (which we just created) and a blob_file_config in JSON format. We’ll create this config file manually. In your terminal:
cd ~/open_model_zoo_downloads/intel/face-detection-retail-0004/FP16/
touch face-detection-retail-0004.json
Copy and paste the following into face-detection-retail-0004.json:
{
    "NN_config": {
        "output_format" : "detection",
        "NN_family" : "mobilenet",
        "confidence_threshold" : 0.5
    }
}
What do these values mean?
output_format- is eitherdetectionorraw. Detection tells the DepthAI to parse the NN results and make a detection objects out of them, which you can access by runninggetDetectedObjectsmethod. Raw means “do not parse, I will handle the parsing on host”, requiring you to parse raw tensorsNN_family- only needed whenoutput_formatisdetection. Two supported NN families are right nowmobilenetandYOLOconfidence_threshold- DepthAI will only return the results which confidence is above the threshold.
Run and display the model output
With both blob and a json blob config file, we’re ready to roll!
To verify that the model is running correctly, let’s modify a bit the program we’ve created in Hello World! tutorial
In particular, let’s change the create_pipeline invocation to load our model. Remember to replace the paths to correct ones that you have!
pipeline = device.create_pipeline(config={
    'streams': ['previewout', 'metaout'],
    'ai': {
-        'blob_file': "/path/to/mobilenet-ssd.blob",
+        'blob_file': "/path/to/open_model_zoo_downloads/intel/face-detection-retail-0004/FP16/face-detection-retail-0004.blob",
-        'blob_file_config': "/path/to/mobilenet-ssd.json"
+        'blob_file_config': "/path/to/open_model_zoo_downloads/intel/face-detection-retail-0004/FP16/face-detection-retail-0004.json"
    }
})
And that’s all!
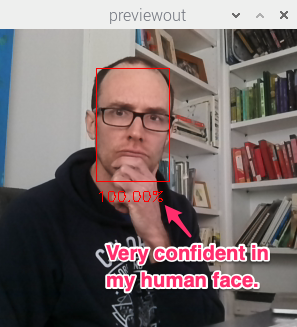
You should see output annotated output similar to:
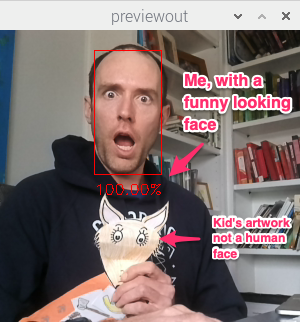
Substitute your face for mine, of course.
Reviewing the flow
The flow we walked through works for other pre-trained object detection models in the Open Model Zoo:
- Download the model:
$OPEN_MODEL_DOWNLOADER --name [INSERT MODEL NAME] --output_dir ~/open_model_zoo_downloads/ - Create the MyriadX blob file:
$MYRIAD_COMPILE -m [INSERT PATH TO MODEL XML FILE] -ip U8 -VPU_MYRIAD_PLATFORM VPU_MYRIAD_2480 -VPU_NUMBER_OF_SHAVES 4 -VPU_NUMBER_OF_CMX_SLICES 4 - Create a JSON config file based on the model output.
- Use this model in your script
You’re on your way! You can find the complete code for this tutorial on GitHub.
 Edit on GitHub
support@luxonis.com