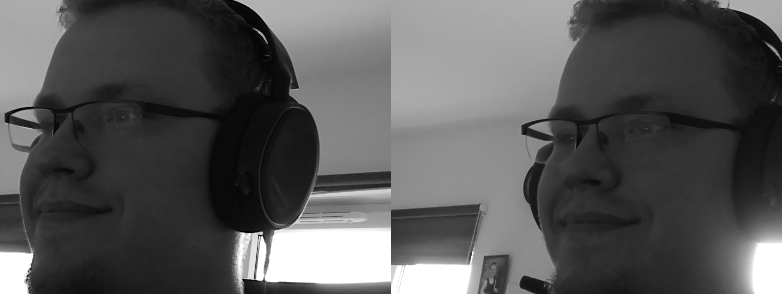
Sample - Mono selfie maker - see your face in two mono cameras and save them using spacebar
This sample requires TK library to run (for opening file dialog)
It also requires face detection model, see this tutorial to see how to compile one
Stereo camera pair is required to run this example, it can either be RPi Compute, OAK-D or any custom setup using these cameras
Demo
Capturing process
Captured image

Source code
import cv2
import depthai

device = depthai.Device('', False)

pipeline = device.create_pipeline(config={
    'streams': ['left', 'right', 'metaout'],
    'ai': {
        "blob_file": "/path/to/face-detection-retail-0004.blob",
        "blob_file_config": "/path/to/face-detection-retail-0004.json",
    },
    'camera': {'mono': {'resolution_h': 720, 'fps': 30}},
})

if pipeline is None:
    raise RuntimeError('Pipeline creation failed!')

detections = []
face_frame_left = None
face_frame_right = None

while True:
    nnet_packets, data_packets = pipeline.get_available_nnet_and_data_packets()

    for nnet_packet in nnet_packets:
        detections = list(nnet_packet.getDetectedObjects())

    for packet in data_packets:
        if packet.stream_name == 'left' or packet.stream_name == 'right':
            frame = packet.getData()

            img_h = frame.shape[0]
            img_w = frame.shape[1]

            for detection in detections:
                left = int(detection.x_min * img_w)
                top = int(detection.y_min * img_h)
                right = int(detection.x_max * img_w)
                bottom = int(detection.y_max * img_h)

                face_frame = frame[top:bottom, left:right]
                if face_frame.size == 0:
                    continue
                cv2.imshow(f'face-{packet.stream_name}', face_frame)
                if packet.stream_name == 'left':
                    face_frame_left = face_frame
                else:
                    face_frame_right = face_frame

    key = cv2.waitKey(1)
    if key == ord('q'):
        break
    if key == ord(' ') and face_frame_left is not None and face_frame_right is not None:
        from tkinter import Tk, messagebox
        from tkinter.filedialog import asksaveasfilename
        Tk().withdraw()
        filename = asksaveasfilename(defaultextension=".png", filetypes=(("Image files", "*.png"),("All Files", "*.*")))
        joined_frame = cv2.hconcat([face_frame_left, face_frame_right])
        cv2.imwrite(filename, joined_frame)
        messagebox.showinfo("Success", "Image saved successfully!")
        Tk().destroy()

del pipeline
del device
Explanation
contact_support
New to the DepthAI?
DepthAI basics are explained in minimal working code sample and hello world tutorial.
Our network returns bounding boxes of the faces it detects (we have them stored in detections array).
So in this sample, we have to do two main things: crop the frame to contain only the face and save it to
the location specified by user.
Performing the crop
Cropping the frame requires us to modify the minimal working code sample, so that
we don’t produce two points for rectangle, but instead we need all four points:
two of them that determine start of the crop (top starts Y-axis crop and left starts X-axis crop),
and another two as the end of the crop (bottom ends Y-axis crop and right ends X-axis crop)
                left = int(detection.x_min * img_w)
                top = int(detection.y_min * img_h)
                right = int(detection.x_max * img_w)
                bottom = int(detection.y_max * img_h)
Now, since our frame is in HWC format (Height, Width, Channels), we first crop the Y-axis (being height) and then the X-axis (being width).
So the cropping code looks like this:
face_frame = frame[top:bottom, left:right]
Now, there’s one additional thing to do. Since sometimes the network may produce such bounding box, what when cropped
will produce an empty frame, we have to secure ourselves from this scenario, as cv2.imshow will throw
an error if invoked with empty frame.
                if face_frame.size == 0:
                    continue
                cv2.imshow(f'face-{packet.stream_name}', face_frame)
Later on, as we’re having two cameras operating same time, we’re assigning the shown frame to either left or right face frame variable, which will help us later during image saving
                if packet.stream_name == 'left':
                    face_frame_left = face_frame
                else:
                    face_frame_right = face_frame
Storing the frame
To save the image we’ll need to do two things:
- Merge the face frames from both left and right cameras into one frame
- Save the prepared frame to the disk
Thankfully, OpenCV has it all sorted out, so for each point we’ll use just a single line of code,
invoking cv2.hconcat for frames merging and cv2.imwrite to store the image
Rest of the code, utilizing tkinter package, is optional and can be removed if you don’t require
user interaction to save the frame.
In this sample, we use tkinter for two dialog boxes:
- To obtain destination filepath (stored as
filepath) that allows us to invokecv2.imwriteas it requires path as it’s first argument - To confirm that the file was saved successfully
    key = cv2.waitKey(1)
    if key == ord('q'):
        break
    if key == ord(' ') and face_frame_left is not None and face_frame_right is not None:
        from tkinter import Tk, messagebox
        from tkinter.filedialog import asksaveasfilename
        Tk().withdraw()
        filename = asksaveasfilename(defaultextension=".png", filetypes=(("Image files", "*.png"),("All Files", "*.*")))
        joined_frame = cv2.hconcat([face_frame_left, face_frame_right])
        cv2.imwrite(filename, joined_frame)
        messagebox.showinfo("Success", "Image saved successfully!")
        Tk().destroy()
Do you have any questions/suggestions? Feel free to get in touch and let us know!


 Edit on GitHub